- Open Command Prompt
- Click the upper-left corner of the Command Prompt window, and then click Properties.
- Click the Options tab.
- In Command History, type or select 999 in Buffer Size, and then type or select 5 in Number of Buffers.
- Click the Layout tab.
- In Screen Buffer Size, type or select 9999 in Height.
- In the Apply Properties dialog box, click Save properties for future windows with same title.
MySQL Enterprise Audit: "[ERROR] Plugin 'audit_log' init function returned error"
Problem
The MySQL Enterprise Audit plugin stops logging to the audit log file /var/log/mysql/audit.log
when the MySQL service starts. The following errors may be seen in the MySQL error log file /var/log/mysql/error.log
:
130228 2:39:50 [ERROR] Plugin 'audit_log' init function returned error. 130228 2:39:50 [ERROR] Plugin 'audit_log' registration as a AUDIT failed.
Solution
When the audit log plugin opens its log file, it checks whether the XML declaration and opening
If the log file exists at open time, the plugin checks whether the file ends with an tag and truncates it if so before writing any
To deal with this problem, you must either remove or rename the malformed log file:
$ sudo mv /var/log/mysql/audit.log /var/log/mysql/audit.log.`date +%Y%m%d` |
Login to the MySQL service as a user with the SUPER privilege. Delete and re-install the audit plugin.
>SELECT * FROM mysql.plugin; +-----------+--------------+ | name | dl | +-----------+--------------+ | audit_log | audit_log.so | +-----------+--------------+ 1 row in set (0.00 sec) >DELETE FROM mysql.plugin WHERE name='audit_log'; Query OK, 1 row affected (0.01 sec) >SELECT * FROM mysql.plugin; Empty set (0.00 sec) >INSTALL PLUGIN audit_log SONAME 'audit_log.so'; Query OK, 0 rows affected (0.03 sec) >SHOW PLUGINS; +--------------------------+----------+--------------------+--------------+-------------+ | Name | Status | Type | Library | License | +--------------------------+----------+--------------------+--------------+-------------+ | binlog | ACTIVE | STORAGE ENGINE | NULL | PROPRIETARY | | mysql_native_password | ACTIVE | AUTHENTICATION | NULL | PROPRIETARY | | mysql_old_password | ACTIVE | AUTHENTICATION | NULL | PROPRIETARY | | MEMORY | ACTIVE | STORAGE ENGINE | NULL | PROPRIETARY | | MRG_MYISAM | ACTIVE | STORAGE ENGINE | NULL | PROPRIETARY | | CSV | ACTIVE | STORAGE ENGINE | NULL | PROPRIETARY | | MyISAM | ACTIVE | STORAGE ENGINE | NULL | PROPRIETARY | | BLACKHOLE | ACTIVE | STORAGE ENGINE | NULL | PROPRIETARY | | FEDERATED | DISABLED | STORAGE ENGINE | NULL | PROPRIETARY | | PERFORMANCE_SCHEMA | ACTIVE | STORAGE ENGINE | NULL | PROPRIETARY | | InnoDB | ACTIVE | STORAGE ENGINE | NULL | PROPRIETARY | | INNODB_TRX | ACTIVE | INFORMATION SCHEMA | NULL | PROPRIETARY | | INNODB_LOCKS | ACTIVE | INFORMATION SCHEMA | NULL | PROPRIETARY | | INNODB_LOCK_WAITS | ACTIVE | INFORMATION SCHEMA | NULL | PROPRIETARY | | INNODB_CMP | ACTIVE | INFORMATION SCHEMA | NULL | PROPRIETARY | | INNODB_CMP_RESET | ACTIVE | INFORMATION SCHEMA | NULL | PROPRIETARY | | INNODB_CMPMEM | ACTIVE | INFORMATION SCHEMA | NULL | PROPRIETARY | | INNODB_CMPMEM_RESET | ACTIVE | INFORMATION SCHEMA | NULL | PROPRIETARY | | INNODB_BUFFER_PAGE | ACTIVE | INFORMATION SCHEMA | NULL | PROPRIETARY | | INNODB_BUFFER_PAGE_LRU | ACTIVE | INFORMATION SCHEMA | NULL | PROPRIETARY | | INNODB_BUFFER_POOL_STATS | ACTIVE | INFORMATION SCHEMA | NULL | PROPRIETARY | | ARCHIVE | ACTIVE | STORAGE ENGINE | NULL | PROPRIETARY | | partition | ACTIVE | STORAGE ENGINE | NULL | PROPRIETARY | | audit_log | ACTIVE | AUDIT | audit_log.so | PROPRIETARY | +--------------------------+----------+--------------------+--------------+-------------+ 24 rows in set (0.00 sec) >SELECT * FROM mysql.plugin; +-----------+--------------+ | name | dl | +-----------+--------------+ | audit_log | audit_log.so | +-----------+--------------+ 1 row in set (0.00 sec) |
Verify that the audit log file /var/log/mysql/audit.log
was recreated and that new MySQL connections are being logged to it.
If the INSTALL PLUGIN
statement executed above fails with the output:
>INSTALL PLUGIN audit_log SONAME 'audit_log.so'; ERROR 1123 (HY000): Can't initialize function 'audit_log'; Plugin initialization function failed. |
it may be because you did not move the malformed audit log file out of the way as stated above. Try:
$ sudo mv /var/log/mysql/audit.log /tmp |
Finally, install the plug-in again:
>INSTALL PLUGIN audit_log SONAME 'audit_log.so'; Query OK, 0 rows affected (0.03 sec) |
Hopefully, it will complete successfully this time.
My System Configuration
- MySQL Enterprise Server 5.5.35
References
Apache Directory Studio "LDAP: error code 13 – confidentiality required for update"
Problem
I am able to use the LDAP client Apache Directory Studio to connect to and browse my OpenLDAP server. However, when I attempt to make a change, I get the error:
Error while executing LDIF - [LDAP: error code 13 - confidentiality required for update] java.lang.Exception: [LDAP: error code 13 - confidentiality required for update] at org.apache.directory.studio.connection.core.io.api.DirectoryApiConnectionWrapper.checkResponse(DirectoryApiConnectionWrapper.java:1280) at org.apache.directory.studio.connection.core.io.api.DirectoryApiConnectionWrapper.access$600(DirectoryApiConnectionWrapper.java:109) at org.apache.directory.studio.connection.core.io.api.DirectoryApiConnectionWrapper$4.run(DirectoryApiConnectionWrapper.java:726) at org.apache.directory.studio.connection.core.io.api.DirectoryApiConnectionWrapper.runAndMonitor(DirectoryApiConnectionWrapper.java:1175) at org.apache.directory.studio.connection.core.io.api.DirectoryApiConnectionWrapper.checkConnectionAndRunAndMonitor(DirectoryApiConnectionWrapper.java:1109) at org.apache.directory.studio.connection.core.io.api.DirectoryApiConnectionWrapper.modifyEntry(DirectoryApiConnectionWrapper.java:748) at org.apache.directory.studio.ldapbrowser.core.jobs.ImportLdifRunnable.importLdifRecord(ImportLdifRunnable.java:514) at org.apache.directory.studio.ldapbrowser.core.jobs.ImportLdifRunnable.importLdif(ImportLdifRunnable.java:272) at org.apache.directory.studio.ldapbrowser.core.jobs.ExecuteLdifRunnable.executeLdif(ExecuteLdifRunnable.java:157) at org.apache.directory.studio.ldapbrowser.core.jobs.ExecuteLdifRunnable.run(ExecuteLdifRunnable.java:123) at org.apache.directory.studio.ldapbrowser.core.jobs.UpdateEntryRunnable.run(UpdateEntryRunnable.java:59) at org.apache.directory.studio.connection.ui.RunnableContextRunner$1.run(RunnableContextRunner.java:112) at org.eclipse.jface.operation.ModalContext$ModalContextThread.run(ModalContext.java:121) [LDAP: error code 13 - confidentiality required for update] |
Note that “confidentiality” means a TLS secured connection.
Solution
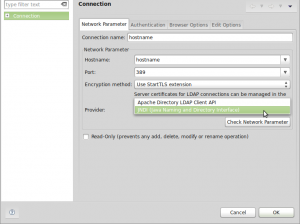
I resolved this problem by changing the Provider setting for this connection from “Apache Directory LDAP Client API” to “JNDI (Java Naming and Directory Interface)”. However, I am not entirely certain as to why this resolves the problem.
My System Configuration
- Client OS: Linux Mint 16 Petra x86 64-bit
- Apache Directory Studio Version: 2.0.0.v20130628
- OpenJDK Runtime Environment 1.7.0_25
- LDAP Server: OpenLDAP 2.4.21
- LDAP Server OS: Ubuntu Lucid 10.04 LTS x86 64-bit
References
Easily Configure a Host-Based Firewall on Ubuntu to Block Incoming Connections
The default firewall configuration tool for Ubuntu is UFW (uncomplicated firewall). It was developed to ease iptables firewall configuration. By default UFW is disabled, and there are no packet filter rules in the Linux kernel:
# iptables -L -n --line-numbers Chain INPUT (policy ACCEPT) num target prot opt source destination Chain FORWARD (policy ACCEPT) num target prot opt source destination Chain OUTPUT (policy ACCEPT) num target prot opt source destination |
When you turn UFW on, it uses a default set of rules that should be fine for the average home user. In short, all incoming connections will be denied, thus protecting the system from intruders. To turn UFW on:
# ufw enable Firewall is active and enabled on system startup |
Once enabled, you are done! All future incoming connections will be denied. This configuration will be reloaded at boot.
You can easily view the status of ufw:
# ufw status Status: active |
If you are interested in seeing what UFW did, then run the following command to output the current UFW rules that are applied to your iptables. While it looks like UFW has done a lot, most of this is benign. UFW basically sets up a framework in order for it to easily add additional rules in the future, as well as faciliting logging.
# iptables -L -n --line-numbers Chain INPUT (policy DROP) num target prot opt source destination 1 ufw-before-logging-input all -- 0.0.0.0/0 0.0.0.0/0 2 ufw-before-input all -- 0.0.0.0/0 0.0.0.0/0 3 ufw-after-input all -- 0.0.0.0/0 0.0.0.0/0 4 ufw-after-logging-input all -- 0.0.0.0/0 0.0.0.0/0 5 ufw-reject-input all -- 0.0.0.0/0 0.0.0.0/0 6 ufw-track-input all -- 0.0.0.0/0 0.0.0.0/0 Chain FORWARD (policy DROP) num target prot opt source destination 1 ufw-before-logging-forward all -- 0.0.0.0/0 0.0.0.0/0 2 ufw-before-forward all -- 0.0.0.0/0 0.0.0.0/0 3 ufw-after-forward all -- 0.0.0.0/0 0.0.0.0/0 4 ufw-after-logging-forward all -- 0.0.0.0/0 0.0.0.0/0 5 ufw-reject-forward all -- 0.0.0.0/0 0.0.0.0/0 Chain OUTPUT (policy ACCEPT) num target prot opt source destination 1 ufw-before-logging-output all -- 0.0.0.0/0 0.0.0.0/0 2 ufw-before-output all -- 0.0.0.0/0 0.0.0.0/0 3 ufw-after-output all -- 0.0.0.0/0 0.0.0.0/0 4 ufw-after-logging-output all -- 0.0.0.0/0 0.0.0.0/0 5 ufw-reject-output all -- 0.0.0.0/0 0.0.0.0/0 6 ufw-track-output all -- 0.0.0.0/0 0.0.0.0/0 Chain ufw-after-forward (1 references) num target prot opt source destination Chain ufw-after-input (1 references) num target prot opt source destination 1 ufw-skip-to-policy-input udp -- 0.0.0.0/0 0.0.0.0/0 udp dpt:137 2 ufw-skip-to-policy-input udp -- 0.0.0.0/0 0.0.0.0/0 udp dpt:138 3 ufw-skip-to-policy-input tcp -- 0.0.0.0/0 0.0.0.0/0 tcp dpt:139 4 ufw-skip-to-policy-input tcp -- 0.0.0.0/0 0.0.0.0/0 tcp dpt:445 5 ufw-skip-to-policy-input udp -- 0.0.0.0/0 0.0.0.0/0 udp dpt:67 6 ufw-skip-to-policy-input udp -- 0.0.0.0/0 0.0.0.0/0 udp dpt:68 7 ufw-skip-to-policy-input all -- 0.0.0.0/0 0.0.0.0/0 ADDRTYPE match dst-type BROADCAST Chain ufw-after-logging-forward (1 references) num target prot opt source destination 1 LOG all -- 0.0.0.0/0 0.0.0.0/0 limit: avg 3/min burst 10 LOG flags 0 level 4 prefix "[UFW BLOCK] " Chain ufw-after-logging-input (1 references) num target prot opt source destination 1 LOG all -- 0.0.0.0/0 0.0.0.0/0 limit: avg 3/min burst 10 LOG flags 0 level 4 prefix "[UFW BLOCK] " Chain ufw-after-logging-output (1 references) num target prot opt source destination Chain ufw-after-output (1 references) num target prot opt source destination Chain ufw-before-forward (1 references) num target prot opt source destination 1 ufw-user-forward all -- 0.0.0.0/0 0.0.0.0/0 Chain ufw-before-input (1 references) num target prot opt source destination 1 ACCEPT all -- 0.0.0.0/0 0.0.0.0/0 2 ACCEPT all -- 0.0.0.0/0 0.0.0.0/0 state RELATED,ESTABLISHED 3 ufw-logging-deny all -- 0.0.0.0/0 0.0.0.0/0 state INVALID 4 DROP all -- 0.0.0.0/0 0.0.0.0/0 state INVALID 5 ACCEPT icmp -- 0.0.0.0/0 0.0.0.0/0 icmptype 3 6 ACCEPT icmp -- 0.0.0.0/0 0.0.0.0/0 icmptype 4 7 ACCEPT icmp -- 0.0.0.0/0 0.0.0.0/0 icmptype 11 8 ACCEPT icmp -- 0.0.0.0/0 0.0.0.0/0 icmptype 12 9 ACCEPT icmp -- 0.0.0.0/0 0.0.0.0/0 icmptype 8 10 ACCEPT udp -- 0.0.0.0/0 0.0.0.0/0 udp spt:67 dpt:68 11 ufw-not-local all -- 0.0.0.0/0 0.0.0.0/0 12 ACCEPT udp -- 0.0.0.0/0 224.0.0.251 udp dpt:5353 13 ACCEPT udp -- 0.0.0.0/0 239.255.255.250 udp dpt:1900 14 ufw-user-input all -- 0.0.0.0/0 0.0.0.0/0 Chain ufw-before-logging-forward (1 references) num target prot opt source destination Chain ufw-before-logging-input (1 references) num target prot opt source destination Chain ufw-before-logging-output (1 references) num target prot opt source destination Chain ufw-before-output (1 references) num target prot opt source destination 1 ACCEPT all -- 0.0.0.0/0 0.0.0.0/0 2 ACCEPT all -- 0.0.0.0/0 0.0.0.0/0 state RELATED,ESTABLISHED 3 ufw-user-output all -- 0.0.0.0/0 0.0.0.0/0 Chain ufw-logging-allow (0 references) num target prot opt source destination 1 LOG all -- 0.0.0.0/0 0.0.0.0/0 limit: avg 3/min burst 10 LOG flags 0 level 4 prefix "[UFW ALLOW] " Chain ufw-logging-deny (2 references) num target prot opt source destination 1 RETURN all -- 0.0.0.0/0 0.0.0.0/0 state INVALID limit: avg 3/min burst 10 2 LOG all -- 0.0.0.0/0 0.0.0.0/0 limit: avg 3/min burst 10 LOG flags 0 level 4 prefix "[UFW BLOCK] " Chain ufw-not-local (1 references) num target prot opt source destination 1 RETURN all -- 0.0.0.0/0 0.0.0.0/0 ADDRTYPE match dst-type LOCAL 2 RETURN all -- 0.0.0.0/0 0.0.0.0/0 ADDRTYPE match dst-type MULTICAST 3 RETURN all -- 0.0.0.0/0 0.0.0.0/0 ADDRTYPE match dst-type BROADCAST 4 ufw-logging-deny all -- 0.0.0.0/0 0.0.0.0/0 limit: avg 3/min burst 10 5 DROP all -- 0.0.0.0/0 0.0.0.0/0 Chain ufw-reject-forward (1 references) num target prot opt source destination Chain ufw-reject-input (1 references) num target prot opt source destination Chain ufw-reject-output (1 references) num target prot opt source destination Chain ufw-skip-to-policy-forward (0 references) num target prot opt source destination 1 DROP all -- 0.0.0.0/0 0.0.0.0/0 Chain ufw-skip-to-policy-input (7 references) num target prot opt source destination 1 DROP all -- 0.0.0.0/0 0.0.0.0/0 Chain ufw-skip-to-policy-output (0 references) num target prot opt source destination 1 ACCEPT all -- 0.0.0.0/0 0.0.0.0/0 Chain ufw-track-input (1 references) num target prot opt source destination Chain ufw-track-output (1 references) num target prot opt source destination 1 ACCEPT tcp -- 0.0.0.0/0 0.0.0.0/0 state NEW 2 ACCEPT udp -- 0.0.0.0/0 0.0.0.0/0 state NEW Chain ufw-user-forward (1 references) num target prot opt source destination Chain ufw-user-input (1 references) num target prot opt source destination Chain ufw-user-limit (0 references) num target prot opt source destination 1 LOG all -- 0.0.0.0/0 0.0.0.0/0 limit: avg 3/min burst 5 LOG flags 0 level 4 prefix "[UFW LIMIT BLOCK] " 2 REJECT all -- 0.0.0.0/0 0.0.0.0/0 reject-with icmp-port-unreachable Chain ufw-user-limit-accept (0 references) num target prot opt source destination 1 ACCEPT all -- 0.0.0.0/0 0.0.0.0/0 Chain ufw-user-logging-forward (0 references) num target prot opt source destination Chain ufw-user-logging-input (0 references) num target prot opt source destination Chain ufw-user-logging-output (0 references) num target prot opt source destination Chain ufw-user-output (1 references) num target prot opt source destination |
This is the rule in the INPUT chain above that drops incoming connections:
DROP all -- 0.0.0.0/0 0.0.0.0/0 |
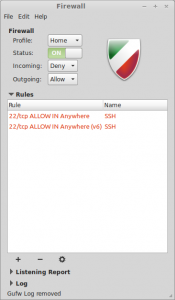
You may want to install gufw. It is a graphical user interface for UFW that provides an easy and intuitive way to manage your Linux firewall. It supports common tasks such as allowing or blocking ports. There is a status switch that can be turned on and off, which basically performs the commands “ufw enable
” and “ufw disable
“.
My System Configuration
- Linux Mint 16 Petra x86 64-bit
References
Configure Ubuntu to be Verbose at Boot
Configure Ubuntu to output more verbosely to the screen at boot.
GRUB 2
Configure GRUB 2 /etc/default/grub
:
# How long to time out showing blank screen. Commenting this out or setting no value # after the = sign means the menu will be displayed for the number of seconds # designated by GRUB_TIMEOUT. #GRUB_HIDDEN_TIMEOUT= |
# Setting to false means grub menu will be displayed GRUB_HIDDEN_TIMEOUT_QUIET=false |
# How many seconds the grub menu will be displayed # before defaulting the value set in GRUB_DEFAULT GRUB_TIMEOUT=5 |
# Remove the kernel parameters "quiet" and "splash" GRUB_CMDLINE_LINUX_DEFAULT="" |
# Disable graphical terminal GRUB_TERMINAL=console |
After updating, run
update-grub |
to create a new /boot/grub/grub.cfg
file.
My System Configuration
- Linux Mint 16 Petra x86 64-bit
References
Configure CentOS 6 to be Verbose at Boot
Configure CentOS 6 to output more verbosely to the screen at boot.
GRUB
Have GRUB display the menu interface. GRUB will still automatically boot the default entry, unless interrupted.
Modify the GRUB configuration file /boot/grub/grub.conf
. Comment out the line that contains “hiddenmenu”.
#hiddenmenu |
Linux Kernel
Modify the GRUB configuration file /boot/grub/grub.conf
. Remove the kernel parameters “quite” and “rhgb” from each kernel entry.
“quiet” causes the kernel to not print out messages while the kernel loads.
“rhgb” enables the Red Hat graphical boot after the kernel loads. You may see this as a logo being displayed to the screen and a progress bar.
Before:
#boot=/dev/sda default=0 timeout=5 splashimage=(hd0,0)/grub/splash.xpm.gz #hiddenmenu title CentOS (2.6.32-431.3.1.el6.x86_64) root (hd0,0) kernel /vmlinuz-2.6.32-431.3.1.el6.x86_64 ro root=/dev/mapper/system-root rd_NO_LUKS LANG=en_US.UTF-8 rd_LVM_LV=system/root rd_NO_MD SYSFONT=latarcyrheb-sun16 crashkernel=auto rd_LVM_LV=system/swap KEYBOARDTYPE=pc KEYTABLE=us rd_NO_DM rhgb quiet initrd /initramfs-2.6.32-431.3.1.el6.x86_64.img title CentOS (2.6.32-431.1.2.0.1.el6.x86_64) root (hd0,0) kernel /vmlinuz-2.6.32-431.1.2.0.1.el6.x86_64 ro root=/dev/mapper/system-root rd_NO_LUKS LANG=en_US.UTF-8 rd_LVM_LV=system/root rd_NO_MD SYSFONT=latarcyrheb-sun16 crashkernel=auto rd_LVM_LV=system/swap KEYBOARDTYPE=pc KEYTABLE=us rd_NO_DM rhgb quiet initrd /initramfs-2.6.32-431.1.2.0.1.el6.x86_64.img title CentOS (2.6.32-431.el6.x86_64) root (hd0,0) kernel /vmlinuz-2.6.32-431.el6.x86_64 ro root=/dev/mapper/system-root rd_NO_LUKS LANG=en_US.UTF-8 rd_LVM_LV=system/root rd_NO_MD SYSFONT=latarcyrheb-sun16 crashkernel=auto rd_LVM_LV=system/swap KEYBOARDTYPE=pc KEYTABLE=us rd_NO_DM rhgb quiet initrd /initramfs-2.6.32-431.el6.x86_64.img |
After:
#boot=/dev/sda default=0 timeout=5 splashimage=(hd0,0)/grub/splash.xpm.gz #hiddenmenu title CentOS (2.6.32-431.3.1.el6.x86_64) root (hd0,0) kernel /vmlinuz-2.6.32-431.3.1.el6.x86_64 ro root=/dev/mapper/system-root rd_NO_LUKS LANG=en_US.UTF-8 rd_LVM_LV=system/root rd_NO_MD SYSFONT=latarcyrheb-sun16 crashkernel=auto rd_LVM_LV=system/swap KEYBOARDTYPE=pc KEYTABLE=us rd_NO_DM initrd /initramfs-2.6.32-431.3.1.el6.x86_64.img title CentOS (2.6.32-431.1.2.0.1.el6.x86_64) root (hd0,0) kernel /vmlinuz-2.6.32-431.1.2.0.1.el6.x86_64 ro root=/dev/mapper/system-root rd_NO_LUKS LANG=en_US.UTF-8 rd_LVM_LV=system/root rd_NO_MD SYSFONT=latarcyrheb-sun16 crashkernel=auto rd_LVM_LV=system/swap KEYBOARDTYPE=pc KEYTABLE=us rd_NO_DM initrd /initramfs-2.6.32-431.1.2.0.1.el6.x86_64.img title CentOS (2.6.32-431.el6.x86_64) root (hd0,0) kernel /vmlinuz-2.6.32-431.el6.x86_64 ro root=/dev/mapper/system-root rd_NO_LUKS LANG=en_US.UTF-8 rd_LVM_LV=system/root rd_NO_MD SYSFONT=latarcyrheb-sun16 crashkernel=auto rd_LVM_LV=system/swap KEYBOARDTYPE=pc KEYTABLE=us rd_NO_DM initrd /initramfs-2.6.32-431.el6.x86_64.img |
This is all you need to do. Unlike Ubuntu, you do not need to run a script such as update-grub
. Future kernel package updates will not add the “rhgb” and “quiet” kernel parameters back.
My System Configuration
- CentOS 6.5 x86 64-bit
References
- http://www.linuxquestions.org/questions/fedora-35/rhgb-options-and-grub-432044/
- http://modem7.wordpress.com/2013/04/03/how-to-make-the-boot-process-for-linux-be-verbose/
- https://access.redhat.com/site/documentation/en-US/Red_Hat_Enterprise_Linux/6/html/Installation_Guide/sn-medialess-editing-grub-conf.html
Running Aide on CentOS 6 Results in Modified mtime and ctime on Directories
Each time aide is run with either the –check or –update option, it always detects differences between the database and the filesystem. Specifically, the mtime and ctime on certain directories:
# aide --check AIDE found differences between database and filesystem!! Start timestamp: 2014-01-05 08:03:47 Summary: Total number of files: 39240 Added files: 0 Removed files: 0 Changed files: 20 --------------------------------------------------- Changed files: --------------------------------------------------- changed: /usr/sbin changed: /usr/libexec changed: /usr/libexec/gcc/x86_64-redhat-linux/4.4.4 changed: /usr/libexec/getconf changed: /usr/libexec/polkit-1 changed: /usr/libexec/utempter changed: /usr/libexec/awk changed: /usr/bin changed: /usr/lib64 changed: /usr/lib64/pm-utils/bin changed: /usr/lib64/nss/unsupported-tools changed: /usr/lib64/sa changed: /usr/lib64/perl5/CORE changed: /root changed: /root/.viminfo changed: /lib/udev changed: /bin changed: /lib64 changed: /lib64/dbus-1 changed: /sbin -------------------------------------------------- Detailed information about changes: --------------------------------------------------- Directory: /usr/sbin Mtime : 2014-01-05 08:00:49 , 2014-01-05 08:01:20 Ctime : 2014-01-05 08:00:49 , 2014-01-05 08:01:20 Directory: /usr/libexec Mtime : 2014-01-05 08:00:49 , 2014-01-05 08:01:21 Ctime : 2014-01-05 08:00:49 , 2014-01-05 08:01:21 Directory: /usr/libexec/gcc/x86_64-redhat-linux/4.4.4 Mtime : 2014-01-05 08:00:49 , 2014-01-05 08:01:21 Ctime : 2014-01-05 08:00:49 , 2014-01-05 08:01:21 Directory: /usr/libexec/getconf Mtime : 2014-01-05 08:00:49 , 2014-01-05 08:01:21 Ctime : 2014-01-05 08:00:49 , 2014-01-05 08:01:21 Directory: /usr/libexec/polkit-1 Mtime : 2014-01-05 08:00:50 , 2014-01-05 08:01:21 Ctime : 2014-01-05 08:00:50 , 2014-01-05 08:01:21 Directory: /usr/libexec/utempter Mtime : 2014-01-05 08:00:50 , 2014-01-05 08:01:21 Ctime : 2014-01-05 08:00:50 , 2014-01-05 08:01:21 Directory: /usr/libexec/awk Mtime : 2014-01-05 08:00:50 , 2014-01-05 08:01:21 Ctime : 2014-01-05 08:00:50 , 2014-01-05 08:01:21 Directory: /usr/bin Mtime : 2014-01-05 08:00:57 , 2014-01-05 08:01:29 Ctime : 2014-01-05 08:00:57 , 2014-01-05 08:01:29 Directory: /usr/lib64 Mtime : 2014-01-05 08:01:09 , 2014-01-05 08:01:42 Ctime : 2014-01-05 08:01:09 , 2014-01-05 08:01:42 Directory: /usr/lib64/pm-utils/bin Mtime : 2014-01-05 08:01:09 , 2014-01-05 08:01:42 Ctime : 2014-01-05 08:01:09 , 2014-01-05 08:01:42 Directory: /usr/lib64/nss/unsupported-tools Mtime : 2014-01-05 08:01:09 , 2014-01-05 08:01:42 Ctime : 2014-01-05 08:01:09 , 2014-01-05 08:01:42 Directory: /usr/lib64/sa Mtime : 2014-01-05 08:01:10 , 2014-01-05 08:01:43 Ctime : 2014-01-05 08:01:10 , 2014-01-05 08:01:43 Directory: /usr/lib64/perl5/CORE Mtime : 2014-01-05 08:01:10 , 2014-01-05 08:01:44 Ctime : 2014-01-05 08:01:10 , 2014-01-05 08:01:44 Directory: /root Mtime : 2014-01-05 07:59:25 , 2014-01-05 08:03:45 Ctime : 2014-01-05 07:59:25 , 2014-01-05 08:03:45 File: /root/.viminfo Inode : 267392 , 267393 Directory: /lib/udev Mtime : 2014-01-05 08:01:14 , 2014-01-05 08:01:48 Ctime : 2014-01-05 08:01:14 , 2014-01-05 08:01:48 Directory: /bin Mtime : 2014-01-05 08:01:15 , 2014-01-05 08:01:49 Ctime : 2014-01-05 08:01:15 , 2014-01-05 08:01:49 Directory: /lib64 Mtime : 2014-01-05 08:01:16 , 2014-01-05 08:01:50 Ctime : 2014-01-05 08:01:16 , 2014-01-05 08:01:50 Directory: /lib64/dbus-1 Mtime : 2014-01-05 08:01:16 , 2014-01-05 08:01:50 Ctime : 2014-01-05 08:01:16 , 2014-01-05 08:01:50 Directory: /sbin Mtime : 2014-01-05 08:01:18 , 2014-01-05 08:01:52 Ctime : 2014-01-05 08:01:18 , 2014-01-05 08:01:52 |
After each execution of aide, the mtime and ctime on these directories are changed. Hence, aide detects and reports these changes.
This is due to prelinking. If you disable prelinking, then this problem will go away. To disable prelinking, modify the configuration file /etc/sysconfig/prelink
. Change “PRELINKING=yes
” to “PRELINKING=no
“. Then manually run /etc/cron.daily/prelink
as root. After updating the aide database, subsequent aide checks will not have this problem.
My System Configuration
- CentOS 6.5 x86 64-bit
- Aide 0.14
# aide --version Aide 0.14 Compiled with the following options: WITH_MMAP WITH_POSIX_ACL WITH_SELINUX WITH_PRELINK WITH_XATTR WITH_LSTAT64 WITH_READDIR64 WITH_ZLIB WITH_GCRYPT WITH_AUDIT CONFIG_FILE = "/etc/aide.conf" |
References
Two-Step Authentication for SSH on CentOS 6 Using Google Authenticator
Google Authenticator implements TOTP (timebased one-time-password) security tokens from RFC6238 via the Google mobile app Google Authenticator. The Authenticator provides a six digit one-time password users must provide in addition to their username and password to login, sometimes branded “two-step authentication”. Here, we install and configure a pluggable authentication module (PAM) which allows login using one-time passcodes.
Download and Install
At the time of this writing, only an old version of libpam-google-authenticator is available in the EPEL package repository. Hence, we are going to compile it from source. First, install prerequisites:
# yum install make gcc pam-devel |
TOTP (timebased one-time-password) security tokens are time sensitive. Hence, make sure that your system has ntpd running, and is configured to start the service at boot:
# service ntpd start Starting ntpd: [ OK ] # chkconfig ntpd on |
Then download and install libpam-google-authenticator from source:
# cd /tmp # wget http://google-authenticator.googlecode.com/files/libpam-google-authenticator-1.0-source.tar.bz2 # bunzip2 libpam-google-authenticator-1.0-source.tar.bz2 # tar xf libpam-google-authenticator-1.0-source.tar # cd libpam-google-authenticator-1.0 # make gcc --std=gnu99 -Wall -O2 -g -fPIC -c -fvisibility=hidden -o google-authenticator.o google-authenticator.c gcc --std=gnu99 -Wall -O2 -g -fPIC -c -fvisibility=hidden -o base32.o base32.c gcc --std=gnu99 -Wall -O2 -g -fPIC -c -fvisibility=hidden -o hmac.o hmac.c gcc --std=gnu99 -Wall -O2 -g -fPIC -c -fvisibility=hidden -o sha1.o sha1.c gcc -g -o google-authenticator google-authenticator.o base32.o hmac.o sha1.o -ldl gcc --std=gnu99 -Wall -O2 -g -fPIC -c -fvisibility=hidden -o pam_google_authenticator.o pam_google_authenticator.c gcc -shared -g -o pam_google_authenticator.so pam_google_authenticator.o base32.o hmac.o sha1.o -lpam gcc --std=gnu99 -Wall -O2 -g -fPIC -c -fvisibility=hidden -o demo.o demo.c gcc -DDEMO --std=gnu99 -Wall -O2 -g -fPIC -c -fvisibility=hidden -o pam_google_authenticator_demo.o pam_google_authenticator.c gcc -g -rdynamic -o demo demo.o pam_google_authenticator_demo.o base32.o hmac.o sha1.o -ldl gcc -DTESTING --std=gnu99 -Wall -O2 -g -fPIC -c -fvisibility=hidden \ -o pam_google_authenticator_testing.o pam_google_authenticator.c gcc -shared -g -o pam_google_authenticator_testing.so pam_google_authenticator_testing.o base32.o hmac.o sha1.o -lpam gcc --std=gnu99 -Wall -O2 -g -fPIC -c -fvisibility=hidden -o pam_google_authenticator_unittest.o pam_google_authenticator_unittest.c gcc -g -rdynamic -o pam_google_authenticator_unittest pam_google_authenticator_unittest.o base32.o hmac.o sha1.o -lc -ldl # make install cp pam_google_authenticator.so /lib64/security cp google-authenticator /usr/local/bin |
Set Up Google Authenticator
Before configuring SSH, first set up Google Authenticator. Run “google-authenticator” as the user you wish to log in with via SSH. You will be prompted with a few questions.
Do you want me to update your "~/.google_authenticator" file (y/n) y https://www.google.com/chart?chs=200x200&chld=M|0&cht=qr&chl=otpauth://totp/user@server%3Fsecret%3DABCD12E3FGHIJKLMN Your new secret key is: ABCD12E3FGHIJKLMN Your verification code is 98765432 Your emergency scratch codes are: 01234567 89012345 67890123 45678901 23456789 Do you want to disallow multiple uses of the same authentication token? This restricts you to one login about every 30s, but it increases your chances to notice or even prevent man-in-the-middle attacks (y/n) y By default, tokens are good for 30 seconds and in order to compensate for possible time-skew between the client and the server, we allow an extra token before and after the current time. If you experience problems with poor time synchronization, you can increase the window from its default size of 1:30min to about 4min. Do you want to do so (y/n) y If the computer that you are logging into isn't hardened against brute-force login attempts, you can enable rate-limiting for the authentication module. By default, this limits attackers to no more than 3 login attempts every 30s. Do you want to enable rate-limiting (y/n) y |
These settings are stored in the user’s ~/.google_authenticator
file.
Copy and paste the URL into your browser and scan the QR code that is displayed with the app Google Authenticator on your mobile device. If you can’t scan the QR code, then you can enter the information manually with the given secret key and verification code. A new verification code should be displayed every 30 seconds.
Emergency one-time use verification codes are also given for you to write down in a secure place in case you were to not have your mobile device with you.
Configure PAM
Have PAM require Google Authenticator for SSH authentication. Modify /etc/pam.d/sshd
and add the line “auth required pam_google_authenticator.so
” at the top.
#%PAM-1.0 auth required pam_google_authenticator.so auth required pam_sepermit.so auth include password-auth account required pam_nologin.so account include password-auth password include password-auth # pam_selinux.so close should be the first session rule session required pam_selinux.so close session required pam_loginuid.so # pam_selinux.so open should only be followed by sessions to be executed in the user context session required pam_selinux.so open env_params session optional pam_keyinit.so force revoke session include password-auth |
This will require all users to use Google Authenticator for SSH authentication. To only require those users with Google Authenticator configured for their account (the ~/.google_authenticator
file exists), then instead enter “auth required pam_google_authenticator.so nullok
“.
The order in which you place items in this file matters. Given this configuration, you will first be prompted for your Google Authenticator verification code, then for your system account password when you SSH into the system.
Configure the SSH Service
Modify /etc/ssh/sshd_config
. Verify these settings:
PasswordAuthentication yes ChallengeResponseAuthentication yes UsePAM yes |
Restart the SSH service:
# service sshd restart |
When you SSH into the system as a user configured for Google Authenticator, you will have to enter the verification code that is displayed in you Google Authenticator app, and then by your system password at the next prompt:
login as: root Verification code: 01234567 Password: ******* # |
If you have any problems, look in the /var/log/secure
system log file.
If you have SELinux enabled, you may not be able to login, and get this error in /var/log/secure
:
Jan 3 23:42:50 hostname sshd(pam_google_authenticator)[1654]: Failed to update secret file "/home/username/.google_authenticator" Jan 3 23:42:50 hostname sshd[1652]: error: PAM: Cannot make/remove an entry for the specified session for username from 192.168.0.5 |
This is probably due /home/username/.google_authenticator not having an appropriate Type Enforcement (TE):
# ls -Z /home/username/.google_authenticator -r--------. username username unconfined_u:object_r:user_home_t:s0 /home/username/.google_authenticator |
See here for additional information on this issue.
Skip Google Authenticator Authentication if Logging in from the Local Network
You may trust systems on you local network enough not not require that SSH connections from them use Google Authenticator. If so, modify /etc/pam.d/sshd
so that it looks like this:
auth [success=1 default=ignore] pam_access.so accessfile=/etc/security/access-local.conf auth required pam_google_authenticator.so |
Then add the file /etc/security/access-local.conf
with the contents:
# Google Authenticator can be skipped on local network + : ALL : 192.168.0.0/24 + : ALL : LOCAL - : ALL : ALL |
This assumes your local network is subnet 192.168.0.0/24.
My System Configuration
- CentOS 6.5 x86 64-bit
- Google Authenticator libpam 1.0
References
- http://code.google.com/p/google-authenticator/
- http://www.linux.org/threads/google-authenticator-for-ssh.4590/
- https://isc.sans.org/diary/How+To%3A+Setting+Up+Google%27s+Two-Factor+Authentication+In+Linux/16270
- http://blog.remibergsma.com/2013/06/08/playing-with-two-facor-authentication-in-linux-using-google-authenticator/
- http://kiteplans.info/2012/04/06/two-factor-ssh-virtualmin-authentication-google-authenticator/
- http://www.cyberciti.biz/open-source/howto-protect-linux-ssh-login-with-google-authenticator/
Prevent Brute-Force SSH Attacks Using iptables
Prevent (or at least slow down) a brute-force SSH attack.
By default, iptables on a CentOS 6 SSH server allows all inbound SSH traffic on port 22. See /etc/sysconfig/iptables
:
*filter :INPUT ACCEPT [0:0] :FORWARD ACCEPT [0:0] :OUTPUT ACCEPT [0:0] -A INPUT -m state --state ESTABLISHED,RELATED -j ACCEPT -A INPUT -p icmp -j ACCEPT -A INPUT -i lo -j ACCEPT -A INPUT -m state --state NEW -m tcp -p tcp --dport 22 -j ACCEPT -A INPUT -j REJECT --reject-with icmp-host-prohibited -A FORWARD -j REJECT --reject-with icmp-host-prohibited COMMIT |
Modify /etc/sysconfig/iptables
to the following in order to allow a particular IP to initiate 5 new SSH connections within a window of 60s. If additional new SSH connections are opened for that IP, then all packets from that IP will be dropped, and the incident will be logged to /var/log/messages
. After 60s that IP will be able to open 5 new SSH connections, and so on. Please note that when I say that a new SSH connection is made that I do not mean to imply the SSH authentication was successful. Just that the two hosts initiated a new TCP/IP connection over port 22.
*filter :INPUT ACCEPT [0:0] :FORWARD ACCEPT [0:0] :OUTPUT ACCEPT [0:0] -A INPUT -p tcp --dport 22 -m state --state NEW -m recent --set --name SSH -j ACCEPT -A INPUT -p tcp --dport 22 -m recent --update --seconds 60 --hitcount 5 --rttl --name SSH -j LOG --log-prefix "BRUTE_FORCE_SSH" -A INPUT -p tcp --dport 22 -m recent --update --seconds 60 --hitcount 5 --rttl --name SSH -j DROP -A INPUT -m state --state ESTABLISHED,RELATED -j ACCEPT -A INPUT -p icmp -j ACCEPT -A INPUT -i lo -j ACCEPT -A INPUT -j REJECT --reject-with icmp-host-prohibited -A FORWARD -j REJECT --reject-with icmp-host-prohibited COMMIT |
# service iptables stop && service iptables start |
My System Configuration
- CentOS 6.5 x86 64-bit
References
Installing DenyHosts on CentOS 6
DenyHosts is a log-based intrusion prevention security tool for SSH servers written in Python. It is intended to prevent brute-force attacks on SSH servers by monitoring invalid login attempts in the authentication log and blocking the originating IP addresses. Upon discovering a repeated attack host, the /etc/hosts.deny
file is updated to prevent future break-in attempts from that host. DenyHosts uses TCP Wrappers and not iptables.
Install DenyHosts
First, add the EPEL repository. Then simply install the package from the EPEL repository:
# yum install denyhosts |
Configure DenyHosts
Before starting DenyHosts, configure a white list of IPs that DenyHosts should never block. Again, DenyHosts uses TCP Wrappers. Hence, edit /etc/hosts.allow
and add IPs, entire subnets, etc. For example,
sshd: 12.34.56.78 sshd: 192.168.0.0/255.255.255.0 |
Start DenyHosts
# service denyhosts start |
Configure the system to start DenyHosts at boot:
# chkconfig denyhosts on |
Basic things to be aware of:
- IPs to white list should be added to
/etc/hosts.allow
. - IPs that DenyHosts blocks will be added to
/etc/hosts.deny
. - The DenyHosts configuration file is
/etc/denyhosts.conf
. - DenyHosts logs everything that it does to
/var/log/denyhosts
. - DenyHosts watches
/var/log/secure
for SSH login attempts. - If a host is ever added to the block list by mistake, just remove it from
/etc/hosts.deny
. You can also manually add hosts you want to block.
Go through the DenyHosts configuration file (/etc/denyhosts.conf
) and tune it to your liking. Be sure to restart DenyHosts (service denyhosts restart
) if you change anything.
My System Configuration
- CentOS 6.5 x86 64-bit
- DenyHosts 2.6