Prevent (or at least slow down) a brute-force SSH attack.
By default, iptables on a CentOS 6 SSH server allows all inbound SSH traffic on port 22. See /etc/sysconfig/iptables
:
*filter
:INPUT ACCEPT [0:0]
:FORWARD ACCEPT [0:0]
:OUTPUT ACCEPT [0:0]
-A INPUT -m state --state ESTABLISHED,RELATED -j ACCEPT
-A INPUT -p icmp -j ACCEPT
-A INPUT -i lo -j ACCEPT
-A INPUT -m state --state NEW -m tcp -p tcp --dport 22 -j ACCEPT
-A INPUT -j REJECT --reject-with icmp-host-prohibited
-A FORWARD -j REJECT --reject-with icmp-host-prohibited
COMMIT |
*filter
:INPUT ACCEPT [0:0]
:FORWARD ACCEPT [0:0]
:OUTPUT ACCEPT [0:0]
-A INPUT -m state --state ESTABLISHED,RELATED -j ACCEPT
-A INPUT -p icmp -j ACCEPT
-A INPUT -i lo -j ACCEPT
-A INPUT -m state --state NEW -m tcp -p tcp --dport 22 -j ACCEPT
-A INPUT -j REJECT --reject-with icmp-host-prohibited
-A FORWARD -j REJECT --reject-with icmp-host-prohibited
COMMIT
Modify /etc/sysconfig/iptables
to the following in order to allow a particular IP to initiate 5 new SSH connections within a window of 60s. If additional new SSH connections are opened for that IP, then all packets from that IP will be dropped, and the incident will be logged to /var/log/messages
. After 60s that IP will be able to open 5 new SSH connections, and so on. Please note that when I say that a new SSH connection is made that I do not mean to imply the SSH authentication was successful. Just that the two hosts initiated a new TCP/IP connection over port 22.
*filter
:INPUT ACCEPT [0:0]
:FORWARD ACCEPT [0:0]
:OUTPUT ACCEPT [0:0]
-A INPUT -p tcp --dport 22 -m state --state NEW -m recent --set --name SSH -j ACCEPT
-A INPUT -p tcp --dport 22 -m recent --update --seconds 60 --hitcount 5 --rttl --name SSH -j LOG --log-prefix "BRUTE_FORCE_SSH"
-A INPUT -p tcp --dport 22 -m recent --update --seconds 60 --hitcount 5 --rttl --name SSH -j DROP
-A INPUT -m state --state ESTABLISHED,RELATED -j ACCEPT
-A INPUT -p icmp -j ACCEPT
-A INPUT -i lo -j ACCEPT
-A INPUT -j REJECT --reject-with icmp-host-prohibited
-A FORWARD -j REJECT --reject-with icmp-host-prohibited
COMMIT |
*filter
:INPUT ACCEPT [0:0]
:FORWARD ACCEPT [0:0]
:OUTPUT ACCEPT [0:0]
-A INPUT -p tcp --dport 22 -m state --state NEW -m recent --set --name SSH -j ACCEPT
-A INPUT -p tcp --dport 22 -m recent --update --seconds 60 --hitcount 5 --rttl --name SSH -j LOG --log-prefix "BRUTE_FORCE_SSH"
-A INPUT -p tcp --dport 22 -m recent --update --seconds 60 --hitcount 5 --rttl --name SSH -j DROP
-A INPUT -m state --state ESTABLISHED,RELATED -j ACCEPT
-A INPUT -p icmp -j ACCEPT
-A INPUT -i lo -j ACCEPT
-A INPUT -j REJECT --reject-with icmp-host-prohibited
-A FORWARD -j REJECT --reject-with icmp-host-prohibited
COMMIT
# service iptables stop && service iptables start |
# service iptables stop && service iptables start
My System Configuration
References
DenyHosts is a log-based intrusion prevention security tool for SSH servers written in Python. It is intended to prevent brute-force attacks on SSH servers by monitoring invalid login attempts in the authentication log and blocking the originating IP addresses. Upon discovering a repeated attack host, the /etc/hosts.deny
file is updated to prevent future break-in attempts from that host. DenyHosts uses TCP Wrappers and not iptables.
Install DenyHosts
First, add the EPEL repository. Then simply install the package from the EPEL repository:
Configure DenyHosts
Before starting DenyHosts, configure a white list of IPs that DenyHosts should never block. Again, DenyHosts uses TCP Wrappers. Hence, edit /etc/hosts.allow
and add IPs, entire subnets, etc. For example,
sshd: 12.34.56.78
sshd: 192.168.0.0/255.255.255.0 |
sshd: 12.34.56.78
sshd: 192.168.0.0/255.255.255.0
Start DenyHosts
# service denyhosts start |
# service denyhosts start
Configure the system to start DenyHosts at boot:
Basic things to be aware of:
- IPs to white list should be added to
/etc/hosts.allow
.
- IPs that DenyHosts blocks will be added to
/etc/hosts.deny
.
- The DenyHosts configuration file is
/etc/denyhosts.conf
.
- DenyHosts logs everything that it does to
/var/log/denyhosts
.
- DenyHosts watches
/var/log/secure
for SSH login attempts.
- If a host is ever added to the block list by mistake, just remove it from
/etc/hosts.deny
. You can also manually add hosts you want to block.
Go through the DenyHosts configuration file (/etc/denyhosts.conf
) and tune it to your liking. Be sure to restart DenyHosts (service denyhosts restart
) if you change anything.
My System Configuration
- CentOS 6.5 x86 64-bit
- DenyHosts 2.6
References
First, list all of your available repositories, and get the repository IDs
# yum repolist
repo id repo name status
base CentOS-6 - Base 6,367
epel Extra Packages for Enterprise Linux 6 - x86_64 10,142+82
extras CentOS-6 - Extras 14
updates CentOS-6 - Updates 287
repolist: 16,810 |
# yum repolist
repo id repo name status
base CentOS-6 - Base 6,367
epel Extra Packages for Enterprise Linux 6 - x86_64 10,142+82
extras CentOS-6 - Extras 14
updates CentOS-6 - Updates 287
repolist: 16,810
To see which packages are just in the “base” repository:
# yum --disablerepo="*" --enablerepo="base" list available
Available Packages
389-ds-base.x86_64 1.2.11.15-29.el6 base
389-ds-base-devel.i686 1.2.11.15-29.el6 base
389-ds-base-devel.x86_64 1.2.11.15-29.el6 base
389-ds-base-libs.i686 1.2.11.15-29.el6 base
389-ds-base-libs.x86_64 1.2.11.15-29.el6 base
ConsoleKit-devel.i686 0.4.1-3.el6 base
ConsoleKit-devel.x86_64 0.4.1-3.el6 base
ConsoleKit-docs.x86_64 0.4.1-3.el6 base
ConsoleKit-libs.i686 0.4.1-3.el6 base
ConsoleKit-x11.x86_64 0.4.1-3.el6 base
DeviceKit-power.i686 014-3.el6 base
DeviceKit-power.x86_64 014-3.el6 base
DeviceKit-power-devel.i686 014-3.el6 base
DeviceKit-power-devel.x86_64 014-3.el6 base
DeviceKit-power-devel-docs.noarch 014-3.el6 base
ElectricFence.i686 2.2.2-28.el6 base
ElectricFence.x86_64 2.2.2-28.el6 base
GConf2.i686 2.28.0-6.el6 base
GConf2.x86_64 2.28.0-6.el6 base
GConf2-devel.i686 2.28.0-6.el6 base
GConf2-devel.x86_64 2.28.0-6.el6 base
GConf2-gtk.x86_64 2.28.0-6.el6 base
ImageMagick.i686 6.5.4.7-6.el6_2 base
ImageMagick.x86_64 6.5.4.7-6.el6_2 base
ImageMagick-c++.i686 6.5.4.7-6.el6_2 base
ImageMagick-c++.x86_64 6.5.4.7-6.el6_2 base
ImageMagick-c++-devel.i686 6.5.4.7-6.el6_2 base
ImageMagick-c++-devel.x86_64 6.5.4.7-6.el6_2 base
... |
# yum --disablerepo="*" --enablerepo="base" list available
Available Packages
389-ds-base.x86_64 1.2.11.15-29.el6 base
389-ds-base-devel.i686 1.2.11.15-29.el6 base
389-ds-base-devel.x86_64 1.2.11.15-29.el6 base
389-ds-base-libs.i686 1.2.11.15-29.el6 base
389-ds-base-libs.x86_64 1.2.11.15-29.el6 base
ConsoleKit-devel.i686 0.4.1-3.el6 base
ConsoleKit-devel.x86_64 0.4.1-3.el6 base
ConsoleKit-docs.x86_64 0.4.1-3.el6 base
ConsoleKit-libs.i686 0.4.1-3.el6 base
ConsoleKit-x11.x86_64 0.4.1-3.el6 base
DeviceKit-power.i686 014-3.el6 base
DeviceKit-power.x86_64 014-3.el6 base
DeviceKit-power-devel.i686 014-3.el6 base
DeviceKit-power-devel.x86_64 014-3.el6 base
DeviceKit-power-devel-docs.noarch 014-3.el6 base
ElectricFence.i686 2.2.2-28.el6 base
ElectricFence.x86_64 2.2.2-28.el6 base
GConf2.i686 2.28.0-6.el6 base
GConf2.x86_64 2.28.0-6.el6 base
GConf2-devel.i686 2.28.0-6.el6 base
GConf2-devel.x86_64 2.28.0-6.el6 base
GConf2-gtk.x86_64 2.28.0-6.el6 base
ImageMagick.i686 6.5.4.7-6.el6_2 base
ImageMagick.x86_64 6.5.4.7-6.el6_2 base
ImageMagick-c++.i686 6.5.4.7-6.el6_2 base
ImageMagick-c++.x86_64 6.5.4.7-6.el6_2 base
ImageMagick-c++-devel.i686 6.5.4.7-6.el6_2 base
ImageMagick-c++-devel.x86_64 6.5.4.7-6.el6_2 base
...
My System Configuration
References
Prepare the source Windows XP system:
- In iTunes, Sync your iPod / iPhone / iPad as you normally would.
- Go to File > Library > Organize Library > Check to organize library and to consolidate files.
- Deauthorize your computer from iTunes by going to Store > Deauthorize This Computer
- Quit iTunes
Prepare the destination Windows 7 system:
- Install iTunes
- In Explorer, go to Tools > Folder Options > View > Show hidden files, folders, and drives > press OK
- Quit iTunes in case you opened it
Transfer files from the source Windows XP system to the destination Windows 7 system:
- Copy “
C:\Documents and Settings\username\My Documents\My Music\iTunes
” to “C:\Users\username\Music\iTunes
“
- Copy “
C:\Documents and Settings\username\Application Data\Apple Computer\iTunes
” to “C:\Users\username\AppData\Roaming\Apple Computer\iTunes
“
- Copy “
C:\Documents and Settings\username\Local Settings\Application Data\Apple Computer\iTunes
” to “C:\Users\username\AppData\Local\Apple Computer\iTunes
“
Note: This does not transfer over device backups.
On the destination Windows 7 system:
- Open iTunes and verify all of your data is there
- Authorize your computer to iTunes by going to Store > Authorize This Computer
- Sync your iPod / iPhone / iPad as you normally would.
My System Configuration
- Windows XP SP3
- Windows 7 Professional SP1
- iTunes 11.1.3.8
References
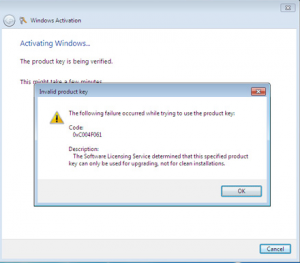
You should be able to install Windows 7 on a bare PC using the upgrade CD without any issue. That is, without having to first install an older version of Windows, and then upgrade. This arguably provides a cleaner install. However, a problem arises when you try to activate your Windows installation:
- Open Windows Activation by clicking the Start button, right-clicking Computer, clicking Properties, and then clicking Activate Windows now.
- If Windows detects an Internet connection, click Activate Windows online now. Administrator permission required. If you’re prompted for an administrator password, type the password.
- Type your Windows 7 product key when prompted, click Next, and then follow the instructions.
You should receive the activation error code 0xC004F061: “The Software Licensing Service determined that this specified product key can only be used for upgrade, not for clean installations.”
To resolve this, you must edit the Windows registry. Open up the start menu and type “regedit” into the search field, followed by enter. Navigate to: HKEY_LOCAL_MACHINE/Software/Microsoft/Windows/CurrentVersion/Setup/OOBE/
(or click Edit then Find and type “MediaBootInstall” into the search field, and press enter). Once found, double-click MediaBootInstall
and change the “1
” to a “0
“. Click Ok and exit the Registry Editor.
Now you must “Re-Arm” the Windows activation sequence. First, you must open a command prompt as an administrator. To do this, open up the start menu and type “cmd” but instead of just pressing enter, you need to press “Ctrl” + “Shift” + “Enter” in order for it to run as an administrator. Alternatively, click the start menu, right-click on the command prompt application, and selecting Run as administrator.
From the command prompt, type “slmgr /rearm” and press enter. Then type “exit” and press enter. Then reboot.
Then activate Windows by performing the steps shown above again. This time it should work.
My System Configuration
- Windows 7 Professional x86 64-bit
References
David Lehman's System Administration Blog