Category Archives: VMware

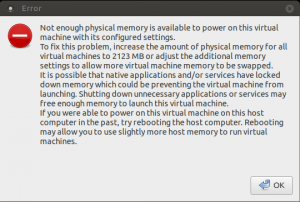
VMware Workstation 14: "Error: Not enough physical memory is available to power on this virtual machine with its configured settings."

Problem

When starting a virtual machine on VMware Workstation 14 and Fedora 27 (Kernel 4.13), the following error is displayed, and the virtual machines cannot be started.  However, there is plenty of free memory on the system.

Not enough physical memory is available to power on this virtual machine with its configured settings.
Solution

“vmmon” is the virtual machine monitor kernel module. You need to modify the source file “hostif.c,” and rebuild the kernel module by running:

sudo su
cd /tmp
cp -p /usr/lib/vmware/modules/source/vmmon.tar /usr/lib/vmware/modules/source/vmmon.tar~backup
cp /usr/lib/vmware/modules/source/vmmon.tar .
tar xf vmmon.tar
rm vmmon.tar
wget https://raw.githubusercontent.com/mkubecek/vmware-host-modules/fadedd9c8a4dd23f74da2b448572df95666dfe12/vmmon-only/linux/hostif.c
mv -f hostif.c vmmon-only/linux/hostif.c
tar cf vmmon.tar vmmon-only
rm -rf vmmon-only
mv -f vmmon.tar /usr/lib/vmware/modules/source/vmmon.tar
vmware-modconfig --console --install-all

VMware Workstation should now work and the virtual machine should now start the next time you start it.

My System Configuration

  • VMware Workstation 14 Pro; 14.0.0 build-6661328
  • Fedora 27 x86 64-bit with Kernel 4.13.16-300.fc27.x86_64

References

VMware Workstation 10: "Error: Could not open /dev/vmmon: No such file or directory. Please make sure that the kernel module vmmon is loaded."

Problem

When starting VMware Workstation, the following error is displayed:

Could not open /dev/vmmon: No such file or directory.
Please make sure that the kernel module `vmmon' is loaded.

Also, virtual machines cannot be started.

Solution

“vmmon” is the virtual machine monitor kernel module. You can rebuid it by running:

sudo vmware-modconfig --console --install-all

Sample output:

Stopping VMware services:
   VMware Authentication Daemon                            [  OK  ]
   VM communication interface socket family                [  OK  ]
   Virtual machine communication interface                 [  OK  ]
   Virtual machine monitor                                 [  OK  ]
   Blocking file system                                    [  OK  ]
Using 2.6.x kernel build system.
make: Entering directory `/tmp/modconfig-lea0x8/vmmon-only'
/usr/bin/make -C /lib/modules/2.6.32-504.1.3.el6.x86_64/build/include/.. SUBDIRS=$PWD SRCROOT=$PWD/. \
          MODULEBUILDDIR= modules
make[1]: Entering directory `/usr/src/kernels/2.6.32-504.1.3.el6.x86_64'
  CC [M]  /tmp/modconfig-lea0x8/vmmon-only/linux/driver.o
  CC [M]  /tmp/modconfig-lea0x8/vmmon-only/linux/driverLog.o
  CC [M]  /tmp/modconfig-lea0x8/vmmon-only/linux/hostif.o
  CC [M]  /tmp/modconfig-lea0x8/vmmon-only/common/apic.o
  CC [M]  /tmp/modconfig-lea0x8/vmmon-only/common/comport.o
  CC [M]  /tmp/modconfig-lea0x8/vmmon-only/common/cpuid.o
  CC [M]  /tmp/modconfig-lea0x8/vmmon-only/common/hashFunc.o
  CC [M]  /tmp/modconfig-lea0x8/vmmon-only/common/memtrack.o
  CC [M]  /tmp/modconfig-lea0x8/vmmon-only/common/phystrack.o
  CC [M]  /tmp/modconfig-lea0x8/vmmon-only/common/task.o
  CC [M]  /tmp/modconfig-lea0x8/vmmon-only/common/vmx86.o
  CC [M]  /tmp/modconfig-lea0x8/vmmon-only/vmcore/moduleloop.o
  LD [M]  /tmp/modconfig-lea0x8/vmmon-only/vmmon.o
  Building modules, stage 2.
  MODPOST 1 modules
  CC      /tmp/modconfig-lea0x8/vmmon-only/vmmon.mod.o
  LD [M]  /tmp/modconfig-lea0x8/vmmon-only/vmmon.ko.unsigned
  NO SIGN [M] /tmp/modconfig-lea0x8/vmmon-only/vmmon.ko
make[1]: Leaving directory `/usr/src/kernels/2.6.32-504.1.3.el6.x86_64'
/usr/bin/make -C $PWD SRCROOT=$PWD/. \
          MODULEBUILDDIR= postbuild
make[1]: Entering directory `/tmp/modconfig-lea0x8/vmmon-only'
make[1]: `postbuild' is up to date.
make[1]: Leaving directory `/tmp/modconfig-lea0x8/vmmon-only'
cp -f vmmon.ko ./../vmmon.o
make: Leaving directory `/tmp/modconfig-lea0x8/vmmon-only'
Using 2.6.x kernel build system.
make: Entering directory `/tmp/modconfig-lea0x8/vmnet-only'
/usr/bin/make -C /lib/modules/2.6.32-504.1.3.el6.x86_64/build/include/.. SUBDIRS=$PWD SRCROOT=$PWD/. \
          MODULEBUILDDIR= modules
make[1]: Entering directory `/usr/src/kernels/2.6.32-504.1.3.el6.x86_64'
  CC [M]  /tmp/modconfig-lea0x8/vmnet-only/driver.o
  CC [M]  /tmp/modconfig-lea0x8/vmnet-only/hub.o
  CC [M]  /tmp/modconfig-lea0x8/vmnet-only/userif.o
  CC [M]  /tmp/modconfig-lea0x8/vmnet-only/netif.o
  CC [M]  /tmp/modconfig-lea0x8/vmnet-only/bridge.o
  CC [M]  /tmp/modconfig-lea0x8/vmnet-only/procfs.o
  CC [M]  /tmp/modconfig-lea0x8/vmnet-only/smac_compat.o
  CC [M]  /tmp/modconfig-lea0x8/vmnet-only/smac.o
  CC [M]  /tmp/modconfig-lea0x8/vmnet-only/vnetEvent.o
  CC [M]  /tmp/modconfig-lea0x8/vmnet-only/vnetUserListener.o
  LD [M]  /tmp/modconfig-lea0x8/vmnet-only/vmnet.o
  Building modules, stage 2.
  MODPOST 1 modules
  CC      /tmp/modconfig-lea0x8/vmnet-only/vmnet.mod.o
  LD [M]  /tmp/modconfig-lea0x8/vmnet-only/vmnet.ko.unsigned
  NO SIGN [M] /tmp/modconfig-lea0x8/vmnet-only/vmnet.ko
make[1]: Leaving directory `/usr/src/kernels/2.6.32-504.1.3.el6.x86_64'
/usr/bin/make -C $PWD SRCROOT=$PWD/. \
          MODULEBUILDDIR= postbuild
make[1]: Entering directory `/tmp/modconfig-lea0x8/vmnet-only'
make[1]: `postbuild' is up to date.
make[1]: Leaving directory `/tmp/modconfig-lea0x8/vmnet-only'
cp -f vmnet.ko ./../vmnet.o
make: Leaving directory `/tmp/modconfig-lea0x8/vmnet-only'
Using 2.6.x kernel build system.
make: Entering directory `/tmp/modconfig-lea0x8/vmblock-only'
/usr/bin/make -C /lib/modules/2.6.32-504.1.3.el6.x86_64/build/include/.. SUBDIRS=$PWD SRCROOT=$PWD/. \
          MODULEBUILDDIR= modules
make[1]: Entering directory `/usr/src/kernels/2.6.32-504.1.3.el6.x86_64'
  CC [M]  /tmp/modconfig-lea0x8/vmblock-only/linux/block.o
  CC [M]  /tmp/modconfig-lea0x8/vmblock-only/linux/control.o
  CC [M]  /tmp/modconfig-lea0x8/vmblock-only/linux/dentry.o
  CC [M]  /tmp/modconfig-lea0x8/vmblock-only/linux/file.o
  CC [M]  /tmp/modconfig-lea0x8/vmblock-only/linux/filesystem.o
  CC [M]  /tmp/modconfig-lea0x8/vmblock-only/linux/inode.o
  CC [M]  /tmp/modconfig-lea0x8/vmblock-only/linux/module.o
  CC [M]  /tmp/modconfig-lea0x8/vmblock-only/linux/stubs.o
/tmp/modconfig-lea0x8/vmblock-only/linux/control.c: In function âExecuteBlockOpâ:
/tmp/modconfig-lea0x8/vmblock-only/linux/control.c:285: warning: assignment from incompatible pointer type
/tmp/modconfig-lea0x8/vmblock-only/linux/control.c:296: warning: passing argument 1 of âputnameâ from incompatible pointer type
include/linux/fs.h:2185: note: expected âstruct filename *â but argument is of type âchar *â
  CC [M]  /tmp/modconfig-lea0x8/vmblock-only/linux/super.o
  LD [M]  /tmp/modconfig-lea0x8/vmblock-only/vmblock.o
  Building modules, stage 2.
  MODPOST 1 modules
  CC      /tmp/modconfig-lea0x8/vmblock-only/vmblock.mod.o
  LD [M]  /tmp/modconfig-lea0x8/vmblock-only/vmblock.ko.unsigned
  NO SIGN [M] /tmp/modconfig-lea0x8/vmblock-only/vmblock.ko
make[1]: Leaving directory `/usr/src/kernels/2.6.32-504.1.3.el6.x86_64'
/usr/bin/make -C $PWD SRCROOT=$PWD/. \
          MODULEBUILDDIR= postbuild
make[1]: Entering directory `/tmp/modconfig-lea0x8/vmblock-only'
make[1]: `postbuild' is up to date.
make[1]: Leaving directory `/tmp/modconfig-lea0x8/vmblock-only'
cp -f vmblock.ko ./../vmblock.o
make: Leaving directory `/tmp/modconfig-lea0x8/vmblock-only'
Using 2.6.x kernel build system.
make: Entering directory `/tmp/modconfig-lea0x8/vmci-only'
/usr/bin/make -C /lib/modules/2.6.32-504.1.3.el6.x86_64/build/include/.. SUBDIRS=$PWD SRCROOT=$PWD/. \
          MODULEBUILDDIR= modules
make[1]: Entering directory `/usr/src/kernels/2.6.32-504.1.3.el6.x86_64'
  CC [M]  /tmp/modconfig-lea0x8/vmci-only/linux/driver.o
  CC [M]  /tmp/modconfig-lea0x8/vmci-only/linux/vmciKernelIf.o
  CC [M]  /tmp/modconfig-lea0x8/vmci-only/common/vmciContext.o
  CC [M]  /tmp/modconfig-lea0x8/vmci-only/common/vmciDatagram.o
  CC [M]  /tmp/modconfig-lea0x8/vmci-only/common/vmciDoorbell.o
  CC [M]  /tmp/modconfig-lea0x8/vmci-only/common/vmciDriver.o
  CC [M]  /tmp/modconfig-lea0x8/vmci-only/common/vmciEvent.o
  CC [M]  /tmp/modconfig-lea0x8/vmci-only/common/vmciHashtable.o
  CC [M]  /tmp/modconfig-lea0x8/vmci-only/common/vmciQPair.o
  CC [M]  /tmp/modconfig-lea0x8/vmci-only/common/vmciQueuePair.o
  CC [M]  /tmp/modconfig-lea0x8/vmci-only/common/vmciResource.o
  CC [M]  /tmp/modconfig-lea0x8/vmci-only/common/vmciRoute.o
  CC [M]  /tmp/modconfig-lea0x8/vmci-only/driverLog.o
  LD [M]  /tmp/modconfig-lea0x8/vmci-only/vmci.o
  Building modules, stage 2.
  MODPOST 1 modules
  CC      /tmp/modconfig-lea0x8/vmci-only/vmci.mod.o
  LD [M]  /tmp/modconfig-lea0x8/vmci-only/vmci.ko.unsigned
  NO SIGN [M] /tmp/modconfig-lea0x8/vmci-only/vmci.ko
make[1]: Leaving directory `/usr/src/kernels/2.6.32-504.1.3.el6.x86_64'
/usr/bin/make -C $PWD SRCROOT=$PWD/. \
          MODULEBUILDDIR= postbuild
make[1]: Entering directory `/tmp/modconfig-lea0x8/vmci-only'
make[1]: `postbuild' is up to date.
make[1]: Leaving directory `/tmp/modconfig-lea0x8/vmci-only'
cp -f vmci.ko ./../vmci.o
make: Leaving directory `/tmp/modconfig-lea0x8/vmci-only'
Using 2.6.x kernel build system.
make: Entering directory `/tmp/modconfig-lea0x8/vsock-only'
/usr/bin/make -C /lib/modules/2.6.32-504.1.3.el6.x86_64/build/include/.. SUBDIRS=$PWD SRCROOT=$PWD/. \
          MODULEBUILDDIR= modules
make[1]: Entering directory `/usr/src/kernels/2.6.32-504.1.3.el6.x86_64'
  CC [M]  /tmp/modconfig-lea0x8/vsock-only/linux/af_vsock.o
  CC [M]  /tmp/modconfig-lea0x8/vsock-only/linux/notify.o
  CC [M]  /tmp/modconfig-lea0x8/vsock-only/linux/notifyQState.o
  CC [M]  /tmp/modconfig-lea0x8/vsock-only/linux/stats.o
  CC [M]  /tmp/modconfig-lea0x8/vsock-only/linux/util.o
  CC [M]  /tmp/modconfig-lea0x8/vsock-only/linux/vsockAddr.o
  CC [M]  /tmp/modconfig-lea0x8/vsock-only/driverLog.o
  LD [M]  /tmp/modconfig-lea0x8/vsock-only/vsock.o
  Building modules, stage 2.
  MODPOST 1 modules
  CC      /tmp/modconfig-lea0x8/vsock-only/vsock.mod.o
  LD [M]  /tmp/modconfig-lea0x8/vsock-only/vsock.ko.unsigned
  NO SIGN [M] /tmp/modconfig-lea0x8/vsock-only/vsock.ko
make[1]: Leaving directory `/usr/src/kernels/2.6.32-504.1.3.el6.x86_64'
/usr/bin/make -C $PWD SRCROOT=$PWD/. \
          MODULEBUILDDIR= postbuild
make[1]: Entering directory `/tmp/modconfig-lea0x8/vsock-only'
make[1]: `postbuild' is up to date.
make[1]: Leaving directory `/tmp/modconfig-lea0x8/vsock-only'
cp -f vsock.ko ./../vsock.o
make: Leaving directory `/tmp/modconfig-lea0x8/vsock-only'
Starting VMware services:
   Virtual machine monitor                                 [  OK  ]
   Virtual machine communication interface                 [  OK  ]
   VM communication interface socket family                [  OK  ]
   Blocking file system                                    [  OK  ]
   Virtual ethernet                                        [  OK  ]
   VMware Authentication Daemon                            [  OK  ]
   Shared Memory Available                                 [  OK  ]

VMware Workstation should now work the next time you start it.

My System Configuration

  • VMware Workstation 10.0.4
  • CentOS 6.6 x86 64-bit

References

VMware Workstation 10 on CentOS 6 Host with Windows 7 Guest Running iTunes

After installing iTunes on a Windows 7 guest, I would then plug my iPhone into a USB port on my CentOS 6 host. Inside of VMware Workstation 10, I selected the appropriate VM, then from the menu bar I selected VM > Removable Devices > Apple iPhone > Connect (Disconnect from host). This causes VMware to attach this USB device to the Windows guest instead of the CentOS host.
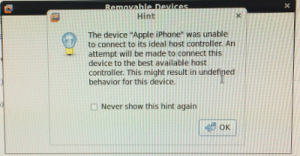
After doing this, I get the following message from VMware: “The Device “Apple iPhone” was not able to connect to its ideal host controller. An attempt will be made to connect this device to the best available host controller. This might result in undefined behavior for this device.”

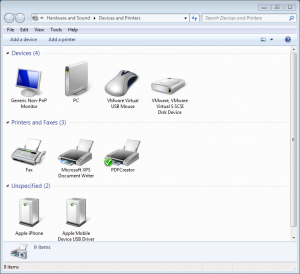
Go to Start > Devices and Printers. You should see two new devices under the Unspecified section called “Apple Mobile Device USB Driver” and “Apple iPhone”.

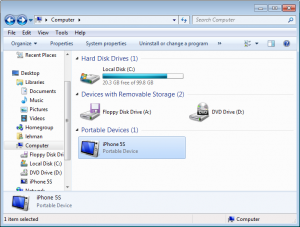
Also, if you open up Explorer and go to Computer, you should see your iPhone listed as a Portable Device.

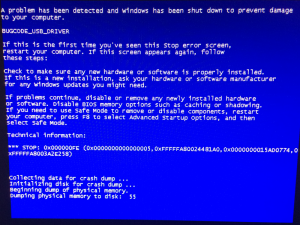
After browsing files on the iPhone within Explorer (using the iPhone as an internal storage device), I get a Windows blue screen including the message “BUGCODE_USB_DRIVER”. The guest machine crashes while the host remains stable.

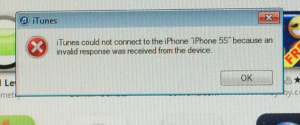
Alternatively, if I opened iTunes while the iPhone is attached to the Windows guest, iTunes would display the error “iTunes could not connect to the iPhone because an invalid response was received from the device.”

Ultimately, I resolved the majority of my issues by powering off the Windows guest VM, going to VM > Settings > USB Controller >
Change USB Compatibility from USB 1.1 to USB 2.0. Save and restart the VM.
Every once in a while iTunes does not recognize the iPhone. Usually this can be resolved, by removing and re-adding the iPhone or closing and re-opening iTunes. Sometimes by adding the iPhone prior to starting iTunes.
In order for Sync over Wi-Fi to work, the guest Windows VM running iTunes should to have an IP on the same physical network as your iPhone. Power off the guest VM, go to VM > Settings > Network Adapter >
Select “Bridged” instead of “NAT”.

My System Configuration

  • VMware Workstation 10.1
  • Host: CentOS 6.5 x86 64-bit
  • Guest: Windows 7 Professional SP1
  • iTunes 11.1.3.8

References

CentOS Host OS Crashes When Installing VMware Tools on a Guest OS Within VMware Workstation 10

Installing VMware Tools on a Windows 7 Guest OS in VMware Workstation 10.1 running on a CentOS 6 host always resulted in the host OS crashing.
This appears to be due to a combination of VMware Workstation 10.1 running on CentOS 6 .5 with kernel 2.6.32-431.1.2.0.1.el6.x86_64 #1 SMP x86_64 GNU/Linux. I see these two interesting items on the screen output followed by a call trace.

BUG: scheduling while atomic: vmware/6035/0x000002000
Pid: 6035, comm: vmware Tainted: G D --------- 2.6.32-431.1.2.0.1.el6.x86_64 #1

2013-12-28_vmware-host-crash
To resolve this issue:

# service vmware-workstation-server stop
# service vmware stop
# mv -v /usr/lib/vmware/modules/binary /usr/lib/vmware/modules/binary~orig
# rm /lib/modules/$(uname -r)/misc/v*.ko
# depmod -a
# yum install make gcc keneral-headers-$(uname -r) kernel-devel
# /usr/bin/vmware-modconfig --console --install-all
# service vmware start
# service vmware-workstation-server start

I could now attempt to install VMware Tools on a Windows 7 Guest OS without the host crashing. However, I now ran into another complication. The VMware Tools install would hang around the point of installing the ThinPrint module. Basically, the VMware Tools install hangs due to cruft left over from previous install attempts. Follow VMware KB Article 1001354 to remove cruft left over from previous VMware Tools installs. Then try reinstalling again.
You do not need to repeat this procedure since the offending modules are being removed in the steps above. During subsequent kernel upgrades, modules will be recompiled automatically.
VMware claims that “this issue should be fixed with the next update (10.0.2), and we will publish a kb article.”
UPDATE: The VMware community appears to agree that this issue is resolved in the Workstation 10.0.2 release.

My System Configuration

  • VMware Workstation 10.1
  • Host: CentOS 6.5 x86 64-bit
  • Guest: Windows 7 Professional SP1

References

PowerCLI: "WARNING: There were one or more problems with the server certificate"

When you run a PowerCLI script that connects to a vCenter Server, which uses a self-signed SSL certificate:

1:57:08 AM Connecting to VI Server
WARNING: There were one or more problems with the server certificate:
* A certification chain processed correctly, but terminated in a root
certificate which isn't trusted by the trust provider.
Certificate: [Subject]
  E=support@vmware.com, CN=foo.example.com, OU="VMware, Inc.", O="VMware, Inc."
[Issuer]
  E=support@vmware.com, CN=foo.example.com, OU="VMware, Inc.", O="VMware, Inc."
[Serial Number]
  C49018FF
[Not Before]
  5/18/2012 9:20:09 AM
[Not After]
  5/16/2022 9:20:09 AM
[Thumbprint]
  AAA9E2D164E7258D0BF2841173AE46034C097FFF
The server certificate is not valid.
WARNING: THE DEFAULT BEHAVIOR UPON INVALID SERVER CERTIFICATE WILL CHANGE IN A
FUTURE RELEASE. To ensure scripts are not affected by the change, use
Set-PowerCLIConfiguration to set a value for the InvalidCertificateAction
option.
PowerCLI C:\> Get-PowerCLIConfiguration
Scope    ProxyPolicy     DefaultVIServerMode InvalidCertificateAction  DisplayDeprecationWarnings WebOperationTimeout
                                                                                                  Seconds
-----    -----------     ------------------- ------------------------  -------------------------- -------------------
Session  UseSystemProxy  Single              Unset                     True                       300
User                     Single
AllUsers

To permanently resolve this, Right-click on PowerCLI > Run as Administrator:

PowerCLI C:\> set-PowerCLIConfiguration -invalidCertificateAction "ignore" -confirm:$false
Scope    ProxyPolicy     DefaultVIServerMode InvalidCertificateAction  DisplayDeprecationWarnings WebOperationTimeout
                                                                                                  Seconds
-----    -----------     ------------------- ------------------------  -------------------------- -------------------
Session  UseSystemProxy  Multiple            Ignore                    True                       300
User
AllUsers                                     Ignore

References

PowerCLI: "Security Warning. Run only scripts that you trust."

Actually, this is an issue with PowerShell and not PowerCLI. When a script is downloaded via Internet Explorer from the Internet or an Intranet, a NTFS Alternative Data Stream is added to the file with a Zone Identifier, indicating the file’s origin. These scripts are unsigned, and thus untrusted.

PowerCLI C:\vCheck-vSphere-master> .\vCheck.ps1
Security Warning
Run only scripts that you trust. While scripts from the Internet can be useful, this script can potentially harm your computer. Do you want to run
C:\vCheck-vSphere-master\Styles\Default\Style.ps1?
[D] Do not run  [R] Run once  [S] Suspend  [?] Help (default is "D"): D

To resolve this, Right-click on PowerCLI > Run as Administrator:

PowerCLI C:\> Get-ExecutionPolicy
Unrestricted
PowerCLI C:\> Set-ExecutionPolicy bypass
Execution Policy Change
The execution policy helps protect you from scripts that you do not trust. Changing the execution policy might expose you to the security risks described in the about_Execution_Policies help topic.
Do you want to change the execution policy?
[Y] Yes  [N] No  [S] Suspend  [?] Help (default is "Y"): Y

References

PowerCLI: "Initialize-PowerCLIEnvironment.ps1 cannot be loaded because the execution of scripts is disabled on this system."

Whenever you start PowerCLI, you see:

File C:\Program Files (x86)\VMware\Infrastructure\vSphere PowerCLI\Scripts\Initialize-PowerCLIEnvironment.ps1 cannot be loaded because the execution of scripts is disabled on this system. Please see "get-help about_signing" for more details.
At line:1 char:2
+ . <<<<  "C:\Program Files (x86)\VMware\Infrastructure\vSphere PowerCLI\Script
s\Initialize-PowerCLIEnvironment.ps1"
    + CategoryInfo          : NotSpecified: (:) [], PSSecurityException
    + FullyQualifiedErrorId : RuntimeException
PS C:\Program Files (x86)\VMware\Infrastructure\vSphere PowerCLI>

To permanently allow the execution of scripts, Right-click on PowerCLI > Run as Administrator:

PS C:\> Get-ExecutionPolicy
Restricted
PS C:\> Set-ExecutionPolicy RemoteSigned
Execution Policy Change
The execution policy helps protect you from scripts that you do not trust. Changing the execution policy might expose you to the security risks described in the about_Execution_Policies help topic. Do you want to change the execution policy?
[Y] Yes  [N] No  [S] Suspend  [?] Help (default is "Y"): y
PS C:\> Get-ExecutionPolicy
RemoteSigned

VMware Workstation "Enter License Key" Button Doesn't Work

On VMware Workstation 9.0.2 running on Linux Mint 15 Olivia, “Help > Enter License Key > Enter License key” doesn’t do anything.
To enter your license key, run this command:

sudo /usr/lib/vmware/bin/vmware-enter-serial

A window will then pop up prompting for your license key, which you may now enter.

vSphere ESXi Evaluation Mode License Assigned to Host has Expired

If the 60-day VMware vSphere ESXi evaluation license expires for a host before you change it to your payed license, you will not be able to power on or reset the virtual machines running, and many features will no longer be available for your ESXi host.
The ESXi host will be disconnected from vCenter. When attempting to reconnect the host via vCenter, you will receive the error message, “The Evaluation Mode License assigned to Host has expired. Recommend updating the license.”2013-05-29_esxi-expire
Since the host is disconnected, and the license has expired, you will not be able to change the ESXi license as you normally would (by going to Configuration > Licensed Features > Edit).

  • Use the vSphere Client to directly login to the affected ESXi host
  • Click the Configuration tab.
  • Click Licensed Features under Software.
  • Click Edit under Licensed Features.
  • Select Assign a new license key to this host.
  • Press Enter and enter the License Key.
  • Click OK.

Installing vSphere ESXi 5 Hypervisor from a USB Drive

  1. Download vSphere ESXi ISO from here: https://www.vmware.com/go/get-free-esxi
  2. Download UNetbootin (Linux, Windows, Mac OS) or Rufus (Windows).
  3. Start UNetbootin and choose:
    • Diskimage
    • ISO
    • Select the downloaded ESXi ISO
    • Type: USB Drive
    • Drive: Select your USB drive
    • Select OK
  4. Boot your host off of this USB drive.

References